Making a Cake Structure

When I started my cake business, one of my greatest achievements is to see the smiling faces of the recipients when they look at their cakes that I made. Even when there were nights that I pulled all-nighters, that smile just melts away the fatigue, and there is this warm sense of triumph that swells from within me. And this is one of the reasons why I am so proud to have been able to work with Cake Angels for the last couple of years.

Cake Angels is a not-for-profit charity who organises cakes for sick children and their family. Its participants consists of volunteers from hobbyists and decorators, like me, who offer a cake to celebrate a special occasion. It is gratifying to be able to contribute, to make a day special for these kids when there are other stresses in life such as finances or a terminal illness which is overwhelming.

I want to share this cake project that I made for Grace, who turned two, loves the colours pink and purple, and loves the animated television character Hey Duggee.

I love making these cakes because I can make it extra special, so I decided instead of making a tiered cake, I wanted to make Duggee come to life. So, why not make an actual Duggee out of cake?

The reason I like to make cakes in 3D is because it gives an impact on the recipient and guests at the party. But there are a few important things to have before making them. Most internal structures for cakes often require the basic necessities of threaded rods, nuts, washers, and always keeping the structure food safe so no bare metal is in contact with cake.

Over the years I have bought a few things to get this structure ready, so you’ll need threaded rods and corresponding sizes of locking nuts, washers, and nuts; hacksaw to cut the rods to the right length; wrenches to tighten the nuts; power drill of course to drill through cake boards. Planning comes to play now – how many guests will be at the party? How big can this cake be? How wide is the cake board going to be? How thick do I need my threaded rods to be? How much cake do I bake to achieve the right height? After planning all of that, it’s on to cutting the rods, drilling the holes in the boards, tightening the nuts, placing the cake boards, etc. The base of the cake was made with a few pieces of foam core boards, stuck together. The other option would be to use rice krispies treats, but I prefer it this way.

DSC_0094

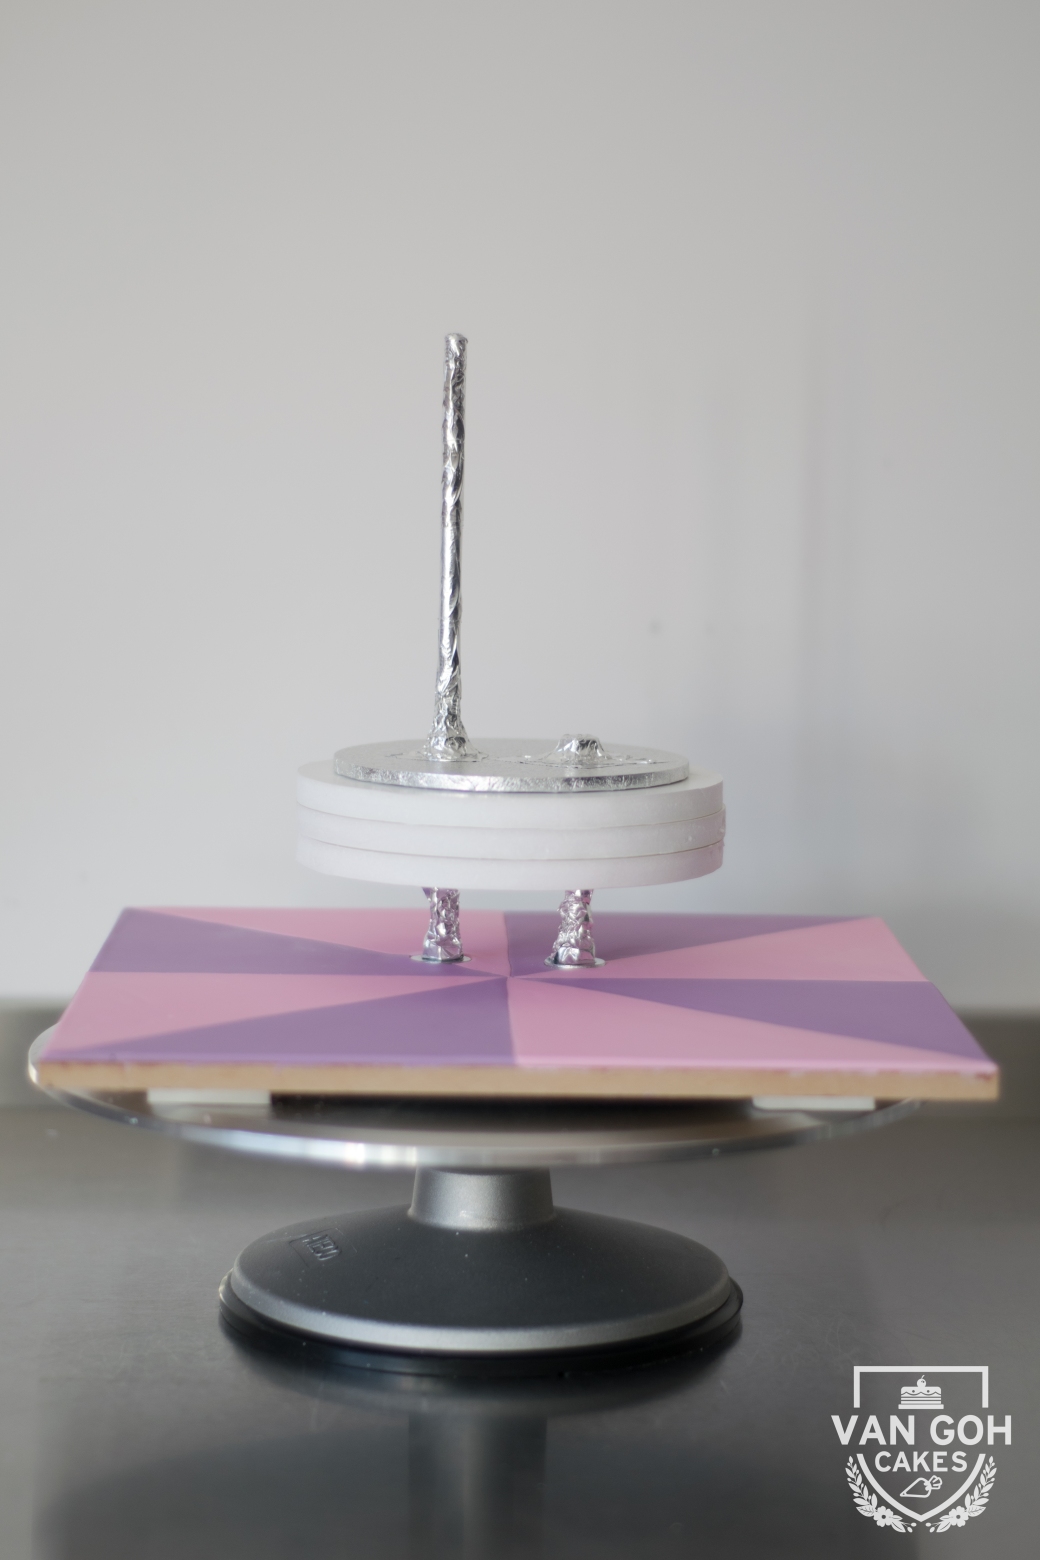
As you can see, I have one threaded rod that is longer than the other. The longer one was used as central dowel to hold the cake together. I cover my internal structures with aluminium foil tape to protect the metal from coming into contact with cake.

I use a spirit level to ensure the board is level, that it’s not tilted to one side nor is it tilted forwards or backwards. This will be crucial when it comes to delivering the cake to avoid disasters, and also it looks awkward if your character isn’t standing upright!

I prepared the board earlier so that it has time to set and be firm, so that I can work on the cake without needing to fuss around with decorating the board. Alternatively, covering the board with contact paper is also a great option.

DSC_0095

Cake was stacked to the height of Duggee. I always have a printed template to the right enlargement of the character so I know what is the exact height that I want to achieve.

In this photo, you’ll notice that the board was covered in Glad wrap so I can carve the cake and ganache without leaving a trail of destruction all over the cake board, and it still looks clean! You’ll also notice that the foam core board has been carved to fit the shape of Duggee, so it’s a win-win for using foam core without the mess of making rise krispies treat!

DSC_0096

Entire cake, including the foam core was covered in ganache. This helps in ensuring the shape is not compromised where the cake and board is at.

Once the cake is ganached, the fun part comes of covering the cake in fondant. Kids can be brutal (if you know what I mean), and they can spot if a hair is out of joint on a character. To help me with ensuring everything is in proportion, I always refer to my template for measurements, because it also helps in planning amounts of a certain colour fondant that’s required.

DSC_0098-2

Marking the cake where Duggee’s uniform is. This keeps the cake in proportion to the actual character.

This step of decorating is the most arduous, but once you have all the proportions right, everything falls into place. And what you’re left, is a beautiful character that is exactly the same as what the kid sees on the television or the mobile device.

DSC_0106-3

Finished Duggee!

When I delivered the cake to Grace, her mum Ally was speechless. And when Grace looked at the cake, she knew it was Duggee right away, and I knew my job was done! They had the reaction that I feel most proud of from making a cake. Thank you again to Kellie from Cake Angels for letting me be a part of it, and I am so grateful to Ally for allowing me to make something special for Grace. x

Adele Bloch-Bauer I

Two years ago, I was on a bus from Washington D.C. en route to Manhattan, when I took my iPad out to watch the film “Woman in Gold”. It was an insightful film about Maria Altmann’s quest to reclaim the Klimt painting of her aunt, Adele Bloch-Bauer I that was stolen by the Nazis during the second World War.

marportrt

Helen Mirren as Maria Altmann in Woman in Gold

And it was also then, that I realised the painting, Adele Bloch-Bauer I, was sold to the son of Estée Lauder and was on display at the Neue Galerie in NYC. Guess what I did the minute I arrived in NYC? Dropped my luggage at my Airbnb, and dashed off to the gallery, braved the long crowds, and saw the piece in person. It was one of the most breathtaking moments in my life.

This has become the inspiration for my tutorial for the Australian Cake Decorating Network’s February edition of Cake! magazine. I’d like to showcase my latest cake, inspired by Gustav Klimt’s painting, Adele Bloch-Bauer I. Many elements from that painting were used to design this beautiful piece, and one of my personal favourites is the textured gold leaf!

I hope you enjoy this tutorial, as much as I was inspired to make it!

To read on how to create this piece, click on this link http://joom.ag/wH5W/p22

Shopping Abroad

There has been something that I’ve wanted to get my hands on, for a very long time.

Hot Hands Modeling Chocolate. The modelling chocolate that is suited to people with hot hands (namely me). The latest medium of choice these days is to use modelling chocolate for the wonderful reasons that are so often raved about by countless of decorators – it holds its shape, blends between joints easily, and it’s the medium of choice for sculpting, and tastes really good. But every time I act upon it, just as I’m about to add the items for checkout, I close the window tab on the Internet browser. I chickened out. The thought of the freight fees and the estimated time of arrival often deterred me from making any online purchases from cake decorating businesses in North America, which begs the next question, “do I really need this?”

One day, in November, I placed this order for my own Hot Hands Modelling Chocolate. As expected, I “sucked it up”, and paid for the postage fee and patiently waited. Six weeks later, after the madness of Christmas and New Year, I finally received it at my workplace. Whilst the long wait seemed to own the product worthwhile, it begs the question and prompted me to write this blog post, how I wished postage was not a deterrent for many decorators like us who live across the globe from North America. Or how the prices are much dearer, from cake decorating supplies stores in Australia. Understandably, they too had to pay for the freight to stock this products.

DSC_0995.jpg

Whilst I am aware of the option of US freight-forwarding services, I am not fully confident of their services than if I had the items delivered directly from who I was dealing with in the first place. So I would like to hear what are your personal experiences. Maybe it’s nothing to do with products or tools that are related to cakes, maybe other products or gifts.

For those who are after cake-related tools, what are your “must-haves” for 2017? What are the items that you want in your local cake supplies stores? I’ve thought of a list of other things that I have wanted since last year, and I would love to hear what you like to have as well

Flexique

13653005_1731556193766081_4189217085201608287_o

One of the latest innovations by Marilyn, this product can make edible fabric, and it works with other mediums like wafer paper and fondant. Fabric is often mimicked with draping fondant or gum paste, but I believe it looks different with this product.

Innovative Sugarworks Sugar Structure

15994631_1833309126886221_8064438334953239032_o

Ahh. I’ll have you know that I am hopeless in making a structure for novelty, or sculpted cakes. Whilst I may be able to come up with one, I have no hope in knowing how to create an internal structure with what is available from home improvement stores like Bunnings in Australia. I need something that is considerably easy to make it food-safe and assemble. This looks like the bees knees for many decorators who would like to have a structure they could easily build upon, and I can’t wait for it to reach our shores.

Flower cutters and veiners, from Giovanna by Sugar Art Studio

1380342_647091611988380_2051367810_n

Many sugar florists will agree that the cutters and veiners from Sugar Art Studio are exquisite, beautiful, and looking at the photos on their website, you (sorta) have the assurance that you could reproduce a flower to look remotely like that. I had the pleasure of organising a delivery to my Airbnb accommodation during my trip to New York, just to avoid the hassle of paying shipping.

I think my next mission is to get Giovanna from Florida to come Down Under to show us how to use her amazing cutters…

Carma Massa Ticino Tropic fondant

11998842_979941498714199_3255884560969940177_n

The fondant/sugarpaste/icing that everyone raves about. How the fondant just stretches, no elephant skin for a long period of time which means you get to work on it for longer for whatever reason it may be. Australians have Bakels which behaves well, and some times you would rather bin the whole bucket and try again with something else. I’d love to get my hands on them!

Simi Cakes Isomalt and Transfer Sheets

13419117_1152737878104841_6781210292040763648_n

Image from Simi Cakes

Honestly, I have been able to play with a some Isomalt over the last two years, and with the rise of the use of isomalt on buttercream cakes like Cakes like Cliff (clink on link so you know what I mean), I feel like experimenting this year.

But what I’m more curious to try is the transfer sheets, which looks transcendent when isomalt is poured over them. In case you don’t know what I’m talking about, you must have a look at some of the amazing creations with the transfer sheets!

Hope to hear some of the things that you want to get from overseas but you’re too afraid to pay for the exorbitant shipping fees!

PS: If the products I listed are available in Australia, let me know!

Threadcakes 2016

I did again, for the second year in a row!

After the rush that I had from entering Threadcakes last year (briefly, Threadcakes is a competition where you recreate a Threadless tees design into cake), I felt like an alumni this year, wanting to prove my worth in cake for a second time. I have not entered cake competitions like this before, so it was fitting to recreate a design from a T-shirt into cake, and see if it’s do-able.

When Threadcakes announced the competition again this year, I went through waves of looking through hundreds of designs that I could do to make this year. The same questions went through my mind again;

  1. Will this design wow the judges? Do I have a winning design?
  2. Do I have to make a very complicated armature/internal structure? Will it be easy to construct?
  3. Will this take long to make, to fit this into my life?
  4. Has this design been done before, and if so, is it wise to make it again?

Somehow, my eyes kept going back to one design, again and again, and that was the Japanese Delicacy by Mellin Paulo Bernardo

1272x920design_01

Japanese Delicacy

I love my food – I mean, who doesn’t love Japanese food? Ramen, sushi, sashimi… But what I liked about the artwork, was the geisha’s distant expression. I hesitated for days on end if this was the right one for me, and I spoke to my friends. They agreed that I should stick to this, and I decided on this design for my cake this year!

Life has been pretty hectic, as a decorator who has a commitment to a full-time job, it’s not always easy getting a perfect balance of work life, and a business to run at the same time. I started on this project last Friday, and worked over the next few days, film myself on the phone, take photos, decorate the cake, edit the photos and the video, remembering to sleep and eat in between, aaaaand decorating the Christmas tree (can’t believe it’s a matter of weeks to Christmas).

This is the result! Ta-da! More photos of my progress in this link here


I’ve edited almost six hours of video footage and condense it into a fourteen minute video. I hope you enjoy watching it as much as I enjoyed making it. But most of all, I hope you will look at the other entries in this upcoming competition, which I hope will stay on for another few years!

Threadcakes is by far one of my favourite cake competitions to enter, and I think it brings out the creativity in every design that has been made thus far. I urge everyone to consider entering, if not for the fun of it, for the love that you have cake after it’s done!

Much love to everyone!

Crawling around Sydney

It’s Friday. End of a long, working week for me. I came home, plonked my workbag, and sat in front of my computer, recalling last weekend that went far too quickly but it was needed for my soul and my sanity. I signed myself to attend the ever-popular Sydney Cake Crawl, organised by Australian Cake Decorating Network, and what great fun it was.

13633361_10153880547551785_1974522193_o

Amazing line-up!

In case you’re wondering what a “cake crawl” is, it’s a social/business event where cake decorators from all walks of life set out on a day’s trip to several locations, watching noted decorators and dessert gurus demonstrate techniques and tips, visiting places with always a sweet treat included, topped with lots of cake shopping. Cake supplies, I mean. You may remember an earlier blog of mine, writing about my experience in New York’s cake crawl last year. I still get excited about that one, but this one was such a treat and much closer to home!

I flew to Sydney on Friday afternoon, readying myself for a great day on Saturday. We started in Hurlstone Park, where we met two great talents – Sachiko Windbiel of Mimicafe Union, and Jacki Fanto of Blissfully Sweet.

The sun was out, and our next stop was at La Renaissance in Waterloo, where I had a much needed mocha fix, and some pastries and little entremets to sweeten the palate. We also had the pleasure of watching the man himself, Jean Michel Raynaud explain to us the use of setting agents like pectin in his kitchen, where the magic happens.

We moved on to Shangri-La Hotel, for what I thought was the highlight of the trip, an afternoon tea with the beautiful and amazing Anna Polyviou. Well known for her appearances on Masterchef and many public events with her sweet treats, we were treated to an afternoon high tea with desserts made by her team. We also get to watch her team demonstrate to us how to make Anna’s Mess, which was one of the highlights of this year’s Masterchef show. From tempering chocolate to making the chocolate moulds, there was music and lots of laughter.


This was basically what an Anna’s Mess is.

Of course, Anna organised a challenge where three ladies went to the front, and made the biggest smash out of Anna’s Mess. It was until she said we need a guy, and I knew “oh crap, that’ll be me!” (joys of being a singular male cake decorator amongst forty six other ladies). If you watch the Youtube video, I projected all my anger and frustration and smashed my dessert. It was a messy affair, but I was ecstatic that I won the challenge, and a brand spanking new Kenwood Chef Sense! I don’t really win competitions or lucky draws, and to win a new mixer was humbling and triumphant at the same time. Thank you so much to Kenwood and Anna for the amazing prize. I’m being impartial, but I love Anna so much more now not only because she awarded the mixer to me, but also her charm and charisma really warms the heart. It was a fantastic afternoon.

Thank you for my new Kenwood!

Usually with cake crawls, you tend to get sugared out after a while. We had too much sugar after the high tea, and I would have liked an afternoon nap. We headed back to Hurlstone Park with some long awaited shopping and a demo with Jessica Pedemont and Tommy Prosser at Celebration Cooking. Tommy provided us with a savoury treat that was so delicious, using bacon that was cured for two weeks. You could tell that we were very much in need of some salt. My camera’s battery went flat after Shangri-La hotel, so I missed out on some photos, but it was an informative session with Jess who showed us show to make ganache as filling, and as truffles. She has so much to offer at her cooking school, Celebration Cooking. Her demonstration ends the cake crawl, and I’m so happy to have been part of it. I met some familiar faces, and made new friends as you do at such social events. Thank you to Liz and everyone that made all of this happen, and I cannot wait for the next one. Bring on London!


Happy Birthday, QEII!

I wanna brag a little. Ok, may be a little more than just a little.

Her Majesty Queen Elizabeth II turned the big 9-0 this year, so a big “Happy Belated Birthday” to her because her real birthday was in April. It will be a public holiday here in Australia for the Queen’s birthday on Monday, so I thought this post is rather timely. When Nadiya Hussain, the winner from the Great British Bake Off made her a cake for Her Majesty to cut, my heart only wished if I, little ol’ me, would ever have the same privilege  to make one too.

Then Cake Masters Magazine, in the UK had a call out for submissions on cake designs to celebrate the Queen’s birthday, and I jumped on the occasion. I may never make her a real cake since she’s kilometers away, but hey, I can make one as though I was asked to, right? And as though she’s made another official trip Down Under. This is probably one of the very few opportunities that I can do so, and off to the drawing board I go!

I thank my friends and family (yes my parents had some input) on the design that I decided on, and ta-daa!!!!

DSC_0428

Happy birthday, Your Majesty!

Yes, it’s very clean and simple. I was gonna go for the Queen’s favourite flowers, but Uncle Google didn’t seem to have an answer for that (or there are what people believe that she likes). The one thing I knew before getting on the Internet was she loves her corgis. Like, they’re fluffy. And ridiculously cute with their little bums. So I knew I wanted a feature on the cake with a corgi, so I thought why not have a corgi wear St Edward’s Crown?

DSC_0432

Happy birthday, Your Majesty!

The next design element (thank you Robyn!) was the overall tiers. I picked the Queen’s gowns and dresses. The top tier was what the Queen wears to formal white-tie functions, simple, a lace dress that seem to catch the light a little, with the navy blue sash. I fashioned it as though it was an embossed design for the top tier, and I used an impression for it and added a pearl luster so it catches the light. I added the Queen’s royal cypher painted gold (which stands for Elizabeth II Regina) against a purple plaque which happens to be one of the colours on the jockeys who ride Her Majesty’s horses.

DSC_0429

Happy birthday, Your Majesty!

The bottom tier was designed based on Her Majesty’s coronation robes. This was a fantastic challenge on picking what elements of the robes to use. I later on decided to paint on the Tudor rose, the maple leaf, the fern, the wattle, and the four leaf clover. The dress itself was so ornate with gold and silver threads, with pearls and crystals arranged in a lattice design. I decided on a simpler approach and to have them piped instead.

embroidery

DSC_0433

Happy birthday, Your Majesty!

I think this cake screams “Her Majesty!” quite fittingly, and I secretly hope deep inside, she will like it! Thank you once again to Cake Masters for allowing readers to make such a momentous celebration sweeter! It’s available in their June edition, together with some amazing tutorials. I may be biased, but I think it’s one of my favourite editions to date 🙂


Vincent x

Learning with Liz Marek!

Whether you decorate cakes as a hobby or as a business, you may have heard of Elizabeth Marek, from Artisan Cake Company. If you haven’t, I urge you to check her out on Facebook, Instagram, even on her cake tutorial website, Sugar Geek Show.

The first time I knew of Liz was when I started cake decorating three years ago. I think it was  when Threadcakes competition was running, and I remembered looking at her entries and they blew my mind. I could not fathom how this steampunk beauty is all cake!

1239511_638669682832208_1076293148_n

That’s not cake! Whaaaaaaaaat!!

Since then, I developed an interest in her work, and the years go by, I am an adoring fan. Her designs blows your mind, and I am constantly in awe of her creations. She started teaching online, with Youtube videos, and recently with the launch of the Sugar Geek Show which I watch religiously, and I look forward to the new tutorials every month. But what was even more exciting was when Bake Boss Australia announced Liz’s tour in Australia, and Melbourne!

12705293_1110517402314098_2136125726016018857_n

The excitement when I saw this on my Facebook feed was indescribable. I knew that I must attend this class!

Classes were released in February, and with a little help from my colleague at work who could fill me in on the days that I’ll be attending Liz Marek’s class, I was set to meet her in person and learn everything she has to offer. May 18th could not come any quicker! It was a fantastic, stress-free two days that one could hope for in a cake class. Her instructions was concise and easy to understand, she guides you on what to do to get the best results, and she allows your creativity to shine through. And as you can see, every fairy was different and matched each and every one’s personality. What enhanced my experience at the class was the fantastic company, together with some familiar faces.


Amongst all the cake idols that I look up to, Liz is constructive, generous, and most of all crazy talented that makes me want to strive for better creativity better designs. So this is my version of my fairy from Liz’s class. A gold blonde fairy, with streaks of black hair for a grunge element haha! Rose gold armour and crown with wings that makes you go beyond Neverland.

DSC_0604

Another heartfelt thank you to Liz for bringing your family to tour down under for weeks away from home sweet home, to Scott from Bake Boss for making this happen. Take home message? If you’re close to where Liz will be hosting a class, I urge you to do so. I think Liz is better than meeting Santa Claus 🙂


x Vincent


The New York “Cake Crawl”

I took a three week break towards the end of August to make a solo trip across the Pacific Ocean to the big apple. It is a personal convention of mine to make it there before I hit thirty this year, to fulfil all my longing inquisitions about the place and the country. I have watched Americans and America behind a television screen all my life, and I wanted to see it all in person.

DSC_0817-2

DSC_0386

DSC_0109

DSC_0020


It’s a bustling, non stop city that caters to the thousands of tourists that prong the Manhattan borough. But, what I learned was not everywhere in NYC is busy, loud and bright. Most of my Airbnb accommodations were located in East Village which I am so grateful and so thankful for the experience, and they were a perfect place for me to rest my weary body after all of the long and crazy adventures, every day.

But I also made time for my favourite cake places, and what better way than with the Australian Cake Decorating Network’s maiden NYC Cake Crawl! Me, along with thirty other ladies whom I’ve become friends with, embarked on a three-day tour around the streets of New York City looking at some of the amazing bakeries and teachers Manhattan has to offer.

DSC_0380

We were fortunate to have met some amazing cake “celebrities” as I like to call it – Sachiko Windbiel from Mimicafe Union; Rudy Martinez from Man Bakes Cakes; Benny Rivera from City Cakes, Elisa Strauss, and the incomparable Ron Ben-Israel from Ron Ben-Israel Cakes, Lisa Mansour, Colette Peters, and Patti Paige from Baked Ideas. We were so grateful to have Raewyn Read from Raewyn Read Cake Design to have joined us throughout the whole crawl, aaaaaand give us a mini demonstration, on a Celboard, on her lap, in Central Park, on a 37 degree heat. Big kudos to her!!!

I was particularly in awe of Ron Ben-Israel’s studio – his immaculate studio produces some of the most breathtaking cakes. I just wished I had a fraction of his amazing talent. For some of us “crawlers”, we would love to be a fly on the wall of his studio even for a day, if not an intern.

In contrast, we had Sachiko’s incredible talent of giving fondant figurines such expression and her signature style makes it hard to miss. Even in her little studio, it could not contain her talent that was in every corner of her studio!

Apart from seeing all the amazing teachers, we had some amazing shopping experiences and bakery after bakery. Oh, did I mention that some of us headed to Rockefeller Centre for the taping of Ellen’s first show of the season in NYC?

DSC_0306-2DSC_0245-3

Such personal experiences are few and far in between, and I thank Liz for organising this trip. To have made all of this happen 17,000km away is a feat, and if you are keen to do this, there will be a second crawl happening in 2016!


Getting My Cake On with Kaysie Lackey

When I started cake decorating as a hobby, I was so immersed in it that I wanted to learn from as many resources that I could find – books, magazines, online tutorials, you name it, I had it. It was when I went on to Cake Masters that I was introduced to Kaysie Lackey. Her tutorial on the Klimt cake really got my head spinning. Everything in that tutorial, I absorbed as much as I can. She referenced artists, took their techniques and styles into an edible medium and achieved spectacular results. She had a great eye on colour and had a very carefree attitude. That was two years ago, when I knew I must attend a course with her!

Kaysie Lackey Ruching Gold Leaf Cake

The finished product! Beautiful, isn’t it?

When she was coming to Australia this year, I was excited. She was going to be teaching a series of classes at Special Treats by Carolyn, which were Nigel the Owl, Blown Away Betty, and Benedict the Bull. PS: I love Carolyn when she gets such amazing teachers! Big ❤ to her!

International cake artists like Kaysie don’t come very often, and I knew I had to attend a class, which I chose Benedict the Bull. She first appeared at the Cake, Bake and Sweets Show in Sydney last month, and I jumped on a ruching and gold leaf workshop instantly when I learned of them. Fondant is such an amazing thing – give it some modelling chocolate, and it stretches like a dream. Stab into it with some modelling shapers, and you get this beautiful fabric-like texture. Add some coloured dusts, and you create dimension of the textures that you made. And a deep cerise heart, and some gold leaf – bam! Fashion-inspired cake! But poor cake suffered in Sydney’s dreadful humidity, and it went out in the bin when I checked out. RIP cake 😦

When August came, I waited in anticipation for the weekend to come where I get to spend two whole days with Kaysie. Kaysie’s classes have been known to include very unique armature. She has a Craftsy class, called Sculpting Magic, which takes you through creating safe and sturdy armature for novelty cakes, and going for a class in person will better familiarise me with armature and the endless possibilities.

Kaysie Lackey Pavlova

Kaysie Lackey with her pavlova!

Kaysie is an excellent person – apart from sharing her life experiences, she talks about what she learned from teaching in other countries. Her suggestions are well-rounded and objective, and very willing to listen to other people’s knowledge. She studied the whole anatomy of the bull and explains what needs to be done to our cakes to achieve them. She looks at each student’s piece and shows you what needs to be done and encourages you to be confident every step of the way. Did I mention she loves show tunes and musicals? Her eclectic taste in music reverberates the room over the two days on her iTunes as we move along from construction of the armature to making the bull’s tail. Or cow’s tail, as some decided to add udders as part of the gender reassignment process.

The one thing that I’ve been nervous about is modelling chocolate. I’ve had some success making it, and then I struggled to get it to the right consistency. But Kaysie showed us how to make it her way, and using it during the two days reminds me of how beautiful it is to work for sculpting and modelling, so much so that when I touched fondant, it felt weird. Its pliability and ability to blend are big advantages, whilst its heat labile property may not be so appealing to people who have hot hands like me. Kaysie then shows us in marrying both fondant and modelling chocolate together, you get a product that showcases the best of both medium! I’m in love!

Kaysie also shows us throughout the two days on how to use the Innovative Sugarworks sugar shapers – they are amazing! Sadly, my hands struggle to go into certain corners, and Kaysie uses different tips effortlessly to achieve the texture that she wants from the bull’s nostrils right to the buttcrack (haha!). The shapers are an extension of the finger tips and it creates more effects on sugar work than what my fingers can physically do, and so I cannot wait to slowly familiarise myself with the different shapes of tips and making full use of them.

Kaysie Lackey Innovative Sugarworks

Kaysie explaining how to use the sugar shapers

Somehow, we managed to spend way more time than expected with Kaysie. We spend an extra hour on Saturday, and a whopping four an a half hours after 5pm on Sunday. Oops. As hungry and tired as I am, I think I managed to get as much as I can out from my time spend with Kaysie and everyone else, and it was a great success.

Kaysie Lackey Benedict the Bull

We’re finally done!

Vincent Goh Kaysie Lackey Benedict the Bull

Moo!!!!

As much as we spent such long hours during the weekend, I didn’t finish my cake. We got to the part where I painted my bull’s spots. Kaysie gave me some direction on finishing the colours, which I did a week after. The result?

Van Goh Cakes Kaysie Lackey Benedict the Bull

Moo!

Yes, this bovine beauty. My recollection of this cake was when we were creating expressions with the eyes, I wanted excitement in his eyes. He turned out looking anxious and in desperate need of a Xanax. Thank goodness for Kaysie who came to save my poor bull. I love Benny, but he will be cut up for some good cuts of “meat” as he is hogging a lot of space in the house. He is a reflection of the fantastic memories I had with Kaysie, and that big learning curve that I had from the weekend.

Thank you Kaysie for your efforts in bringing your knowledge and wisdom Down Under, and I know we will get to see you very soon!

A Day with Faye

Photography by Van Goh Cakes

Gold… and flowers. Welcome to Faye Cahill Cake Design studio!

I’ve been in Sydney for a week to be part of the Australian Cake Decorating Network Luna Park art gallery project at the Cake, Bake & Sweets show. Being a home-based cake business owner, it is often refreshing to be meeting faces of other decorators who are interstate and pursuing their passion from their home kitchens. Getting to know people through Facebook and forums feels like pen pals – you know who they are, you see profile photos of them, but it’s not the actual human connection that we sometimes forget or do not get to establish in this day and age. These decorators whom I’ve come to know and love as dear friends or “cake family” inject life into what I love doing, and that makes me want to strive for better cake designs. Last year, the Cake, Bake & Sweets show was the highlight of my trip to Sydney. It was the first time a show of such magnitude was held in Australia, and I was excited to be a part of it. This year, I was fortunate enough to visit Faye Cahill’s cake studio in Marrickville. In case you’re wondering who’s Faye Cahill, Faye is one of the top cake decorators in Sydney, who produces the most exquisite wedding cakes that are not only the envy her brides, but many other budding decorators like myself from all around the world. Her work have appeared in wedding magazines, and her craft has such warmth and a distinct style, you could tell if it is a Faye Cahill cake.

Photography by Van Goh Cakes

With these as window displays, how could you not stop in your tracks to look at these cakes?

On the long awaited day (and the last day of my trip in Sydney), I was having the jitters as I hopped on the bus that will take me to Faye’s studio. As I made my way down Addison Rd, I was nervous as I stepped into the studio to catch a glimpse of what it is like to be in the Faye Cahill Cake Design studio. What was two short years of ogling and seeing Faye’s studio in photos on Facebook and Mr Google became surreal – I was finally standing in Faye Cahill’s cake studio.

YEEEEEEEEEEEEEEEEEEEEEEEEEEEEE!!!!!!!!!!


Photography by Van Goh Cakes

Aren’t the figurines the cutest?

I felt very welcomed at the studio as I got acquainted with Faye’s team that produces the amazing cakes – Maree, Michelle, and Rebecca. There was so much to take in that I don’t think it’s ever enough – Maree making sugar flowers, Michelle mixing colours to paint on flower petals, Rebecca working at the computer (how I’d love to have someone do all my admin work!), and Faye adding the lace embellishments on to a cake. You could not help yourself but embrace the positive energy of being in a studio setting as opposed to working from home. Alone. It was a refreshing experience watching how everyone works together in a studio making cakes, when it is usually me, myself and I doing everything that they’re doing. I watched Faye as she explains to me how a lace pattern on the bride’s dress ends up being a sketch onto tracing paper. She carefully maps out where the lace pattern will go on the cake, and what she does next is simply amazing – watching how she cuts pieces of fondant which mimics design motifs from a lace with an embossed lace pattern, making beaded designs out of moulds, and lastly the part which I love watching, is getting the colours just right as she mixes copper with gold to achieve the perfect colour on the cake. Faye had me colour some filler flowers for the cake which I couldn’t be more obliged to do, and again watched her work her magic with achieving the right colour for her filler flowers. Casual conversations were thrown in here and there, and it made my time at the studio very light and enjoyable.

Photography by Van Goh Cakes

This eight-tier cake is really something!

Just as my visit was reaching an end, Faye had visitors, and not just any visitors. Sharon Wee, Miso from Miso Bakes, Margie Carter and Weennee Tan who from Sugar popped by before I left.

Am I starstruck yet?

One should feel starstruck, but you are subconsciously reminded that they are regular people who do regular things, you know, like hanging out with the incredible Faye Cahill. 🙂

I left Faye’s studio in a hurry to the airport to board my plane back to Melbourne. Thank you Faye and co for letting me have a sneak peek into their daily activities. It was a short visit, but really, it lasted a lifetime and it could have gone forever. It has got me thinking of the possibilities of a studio of my own in the future, and this has planted a seed in my head. Faye’s hospitality has truly touched me, and I can’t wait to get back there to hopefully create something truly amazing! 🙂

Photography by Rebecca

L-R: Weennee Tan; Me; Faye Cahill; Margie Carter; Sharon Wee; Miso

Alice? Alice? (You can finish the phrase in your head!)

Hi everyone,

My name is Vincent, or more endearingly, Keng Seng (dare you to pronounce it properly 🙂 ). And I’m a self-professed class tart. That name was given to me last year as I breezed in and out of cake classes as I made that a 2014 new year’s resolution to enrich my skills in cake decorating. Some of you might think, why? Well, we keep learning until the day we die, so why not? It was money well spent, in my opinion.

But I knew there was a class not to be missed, especially when the class is by Handi Mulyana, from Handi’s Cakes. He was coming to Melbourne this year to spend time to show us how to make his Alice in Wonderland cake, and how could I refuse?

DSC_0638

The class last weekend was such a wonderful and calming experience. Cake decorating for me is my zen, and I knew I was in my element as I learned from the master himself in those two days. After day one, you have so many learning outcomes that can be achieved from this class. It wasn’t just learning how to make such a jaw dropping, topsy turvy cake, but it involves basic cake decorating skills –  the wrap method, how to achieve sharp edges, how to have a stable internal structure for carrying cakes, how to cover a sphere, the list goes on. It felt like a good refresher course – most of the skills that I have acquired so far were online tutorials, but it felt good to have someone show you once again and to troubleshoot (which I did of course, make errors with my cake – Handi did say I will have to cover the cake again if it were him, ack!)

DSC_0645

Absolom and the card soldiers! Love how vibrant Absolom actually looked, especially with his um, shisha?

DSC_0642

Alice falling into the cake!

DSC_0649

The mad hatter and his supersized gloves

DSC_0667

All the lovely sweet treats!

DSC_0663

The clock that gave me grief the whole time during class – it wouldn’t stay put despite numerous attempts to keep it in place. It was in an awkward spot where the clock could not rest properly, which probably contributed to it. I came home and redid the clock and gave it a gold finish too. Looks much better!

We had such a blast on the first day, everyone at the class were focused and concentrating hard that we finished half an hour earlier than scheduled. We had so much on the second day however to complete that we went over by an hour and a half! I was exhausted after the second day, but to have learned so much in that two days was rewarding. Initially, I was nervous and a little shy to ask questions, but come day two, I just wanted to finish and so I kept asking stupid questions. I look back at the class and enjoyed every single moment of it. Big thanks goes to Sarah from The Cake Stop who has not only housed us all and was extremely patient and hospitable, but have gone above and beyond in making our class enjoyable. Oh and her mochas are awesome too!

DSC_0660

The Cheshire cat grin. I feared it would have been difficult, but turned out to be much easier than I would’ve imagined

Thank you so much Handi for a great class as always, and I know I’d love to have another class with you again! I’d highly suggest any of his classes to anyone at any skill level too, you will not be disappointed!

DSC_0607

The obligatory photo with Handi, licking the lollipop 🙂

What Australia Means To Me

Happy 2015!

I hope everyone had great Christmas and New Year celebrations, and heading into the new year with lots of great plans for the year!

I wanna share with you my excitement – my first sugar artist/cake decorators’ collaboration ever!!!

I couldn’t be more happier with the opportunity to work with some fantastic veteran cake decorators in the business from Australian Cake Decorating Network to showcase our creations for Australia Day today! Our theme for this showcase was “What Australia means to me”, and we could not wait to share our different interpretations of our own Aussie experiences in sugar art.

I’ve been in Melbourne for ten years now, and I asked myself what was the common theme in my so-called developmental years of my life living on my own in a foreign land and becoming myself. And it was always food… then there was wine… and then coffee. Before I came to Melbourne, I did not touch a glass of wine or coffee as I didn’t know how to appreciate them. But in recent years, I’ve come to learn how to taste it and appreciate it, and now I have a better understanding for it I seem to enjoy it a little more now. And so my mind was set on having these elements part of my cake design.

I wanted a challenge, and I came up with an idea of a bottle of wine pouring into a cup of coffee (I would never know what coffee and wine tastes like, it may be an acquired taste but who knows?). The cup of coffee will sit above a chef’s hat, and I’ll have something next to the chef’s hat. Easy!

How wrong I was!

When cake designs don’t fit the mould of standard cakes or stacked cakes, the challenge comes in creating a strong and stable structure inside the cake so everything pretty much stays the way it is! I usually get nervous because it means having to work out what kind of tools are required that I will have to go to Bunnings to buy them. I get intimidated in Bunnings – something about hardware and power tools just doesn’t sit well with me. And so I looked up as many novelty/gravity defying tutorials to understand and construct a structure that I find best suits this piece, and headed to Bunnings.

On to the details of the cake.

DSC_0351

I’m somewhat a foodie, and as much as I love just having two-minute noodles, it’s interesting to know of upcoming restaurants and fantasise of the restaurants that are on my bucket list. My chef’s hat is representative of that – fine dining is vogue these days, with food styling and #foodporn going off in social media. It is also a tribute to all the great Aussie chefs – what great culinary talent we have in this beautiful country, showcased by television shows such as Masterchef. I could go on, but we have Jacques Reymond, Shannon Bennett, Luke Nguyen, Christine Mansfield, Maggie Beer, Kylie Kwong, Peter Gilmore… et cetera, et cetera, et cetera. I really can go on. Lastly, the chef’s hat is symbolic of the logo that is on The Good Food Guide that many foodies refer to to find out the ratings on the go-to restaurants not only in Melbourne, but in other states too.

DSC_0348A little cup of coffee ended up in this piece because I think it is a personal habit of mine that I order when I go to a good cafe for breakfast or brunch. I’ve been hooked to coffee in the last two years or so. My favourite is mocha (in case you have a trivia competition about me), and not everyone makes a great mocha. My housemate Lynn made a remark about “brunching” – it was something that I observed many people do these days as a main meal on a weekend morning and myself, and having a cup of coffee seems to just make it all better. I can share one of my New Year resolutions, and that is to sign myself up for a barista course this year. After all, it is something that I intend to pick up to fulfil my dreams of having a cafe, isn’t it?

I had to chuckle 🙂

DSC_0336

The wine bottle is very Australian in my opinion – it is something that I notice from my days in university, people bringing a bottle to a restaurant or ordering with their meals. I never fancied it, and to date I probably don’t really drink that much. Something about pairing the right notes of a wine with the food that you eat is such an art, I think my taste buds have not acquired that talent yet. But I do enjoy a good little sip of a good bottle, and it would be blasphemy to not include wine into my piece.

DSC_0291

The last element on my showcase is the cheese platter. This idea was thrown to me to create the cheese platter like a map of Australia. Boom! Why didn’t I think of it?! I had a great time creating it, and having brie cheeses and green olives with some crackers is like an indulgence after a good meal.

DSC_0293

I hope you liked my piece, and do look out for the other pieces on the Australian Cake Decorating Network page to look at some more awesome creations from the other decorators!

x Vincent

Cake Competitions – Part 1

Competitions are hard.

But most of all, there’s so much work and preparation that goes into any competition. Any. Well, except for the spelling bee competition that I entered when I was ten which I didn’t know how to prepare for other than reading the dictionary which I felt was rather aimless – I didn’t go through in the end.

I’ve done my fair share of cake competitions this year, but wanted to bring you into my amateur-ish take on this world of decorating cakes for competitions.

My decision to enter the Royal Melbourne Show was influenced by Hannah from Storytale Cakes. It never crossed my mind to enter the show, as I was still unaware of the cake competitions available in Victoria. Within a split moment I said, OK, I’ll do it! Mind you, I had entered the Art of Cake challenge which was happening during the Cake, Bake & Sweets show in Melbourne in October, so to have put my hand up for this competition meant more work from me.

I chose to enter the Birthday Cake or Celebration Cake category, which is a different take from my point of view. Competition cakes for me has always been wedding cakes or novelty cakes, and picking this category was a fresh take. I started having a boy’s birthday cake in my head, but as the weeks went by, I changed my mind and decided to create a birthday girl’s birthday cake. I’ve made several boys’ cakes, and a girl’s cake would be something to expand my portfolio.

I don’t sketch any of my cakes – I’m a terrible sketcher, and that is surprising given my avid interest in drawing as a child. I guess so many years in between were dedicated to studies that I just lost touch. The one thing that stuck with me when designing this cake was a maypole (the pole with lots of ribbons and people go around with it with the ribbons in their hands – yeah I had no idea that was what it was called!). It kept popping in my head for a long time, and I knew the design had to have a maypole in it.

The cake was going to be a two-tier cake, and I knew I wanted to try a new skill with it. During the brainstorming session, I have been watching Faye Cahill’s tutorial on Paul Bradford’s Sugarcraft School. She gave an in-depth tutorial on how she creates her signature cakes, which involved piping, silver leaf, appliques, and luster. what I loved most about the tutorial was that I had creative control as to how I can colour lustre, but most of all, you don’t need to keep hundreds of lustre colour when really you could make them all yourself! Because the lustre can have almost a silky sheen to it, I wanted a colour which was feminine, young, and playful. So I chose a yellow lemon tone to it. DSC_0565The maypole was going to be the feature on the top-tier, and so I wanted the tier to look as though the maypole is perched high and proud along plains of grass, and I will achieve that with a bit of watercolour. I added pieces of teardrop-shape white fondant to look like rolled clouds in the sky, and that gives it a bit of dimension. This project was where I wanted to have elements in both 2D and 3D to play with the eye a little, tacky as it may sound, but I know my eye gets drawn to such things.


DSC_0570The ribbons on the maypole was achieved using thin strips of coloured fondant, and I didn’t know how best to place them. So I thought, give it the illusion of the ribbons floating in the air . That required a lot of manoeuvring the strips so that it stays in place and doesn’t flop. People may start to think that it will need CMC so that it firms up fast enough, I’ll say if I’m impatient and I can do without it, so can anyone else. I may have gone overboard, but I think the effect just looks colourful. People’s eyes tend to go for something a little more colourful, doesn’t it? 🙂

Now I had to tie the two tiers together because at the moment they don’t look like they flow from one cake to another. Hence I decided to have little pink blossoms that flow from the top-tier to the bottom, in a ombre fashion. Genius, I thought. I started to pump these little babies out like there was no end to it, as they say, if you think you’ve pumped enough, you need to pump out more. And thankfully I did, and it looked like a cohesive cake piece.DSC_0569

Did I forget to mention that I had piping on this cake? Yes I forgot to mention that Faye’s tutorial heavily influenced this piece, and so I took a leap of faith and grabbed myself a piping bag with royal icing, and piped out a monogram that surprisingly did not take very long to do. After the monogram was done, boy did I feel triumphant! It may not sound like it is a big deal, but I am sure a lot of cake decorators may agree piping with royal icing, even buttercream, may be arduous and messy and stressful!

Here’s the finished piece!

DSC_0632

The complete competition piece


DSC_0579

Front


DSC_0607

This baby’s got back!

Delivering this cake to the competition venue was a stressful event for me – I lost my way and had absolutely no clue where to go. Finally after 40 minutes of driving aimlessly, I told myself I must place in this competition after my horrendous drive!

And guess what?

I did place! Second! This project is still very dear to me as it is my first win after many competitions, and I get a red ribbon too! (Blue ribbon is for 1st place winners, but blue isn’t really my colour anyway 🙂 )

DSC_0889


I’ll be keeping this piece for a while, but not too long as I have more plans ahead for amazing new projects!